Last updated on February 24th, 2025 at 08:23 pm

As computer and internet use has grown, data collection has moved from paper-based to online using fillable forms. These forms make it easier for information to be collected and processed. Since the information is fed directly into the computer, these forms reduce the time between collection and processing. This actually reduces the data validation and verification process. However, for those wishing to collect information online, creating a fillable form in Word may seem challenging.
In this article, we will explore:
- How to prepare a fillable form in Word and set up the properties.
- How to add a tickbox;
- Add an option button;
- Insert a date picker field;
- Add a text box;
- How to add a dropdown box.
- How to add the developer tab in Word.
What is a fillable form?
In information technology, a fillable form is a form that has editable fields. It is designed to be filled directly on the computer. It can be filled and printed, saved, or immediately sent back to the place of origin. Fillable forms are a very efficient way to collect information.
In Microsoft Word, the tools used to set up a fillable form are available on the developer tab. However, this tab is not available by default. As such, it is imperative that you set up the developer tab before attempting to create a fillable form.
Forms are not only available in Word. Did you know that we work with forms in databases, too?
How to add the developer tab in Word 365
To add the developer tab in Word 365, you need to follow these steps:
- Open Microsoft Word 365.
- Go to the file tab.
- At the bottom of the file tab, click options.
- On the menu that pops up, choose the customize ribbon option in the first section.
- This opens up a new section in the popup menu.
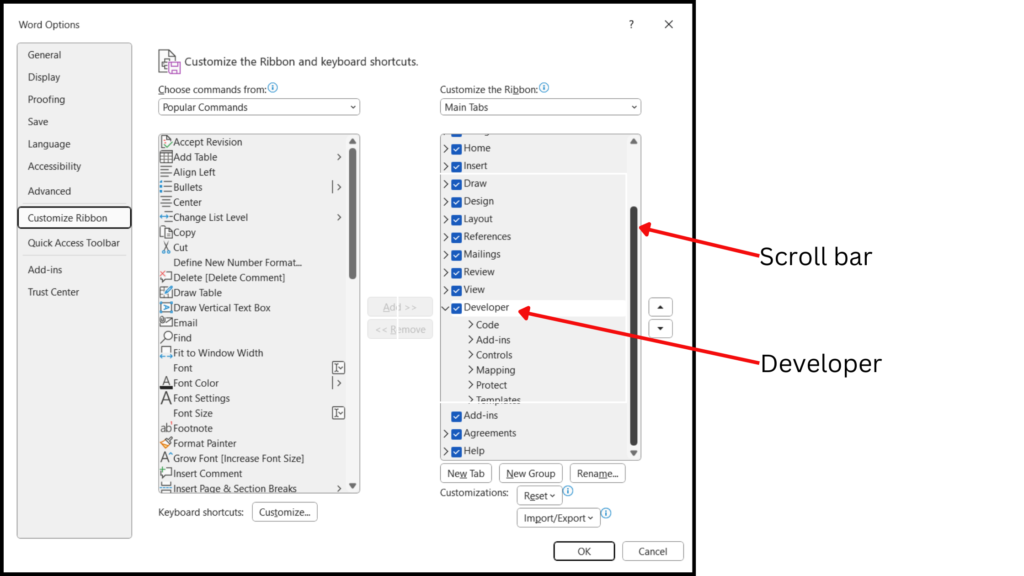
- Use your scroll bar to scroll down the last section until you see the checkbox with the label developer.
- Click that option, then click ok.
- That’s it you can now see the developer tab in Word.

Now you are ready to create a fillable form in Word.
Creating a fillable form in Word 365
For this part of our tutorial, we will open a new Word document. We will prepare a fillable form that will capture:
- Names;
- Genders;
- Dates of birth;
- Citizenship; and
- Allergies.
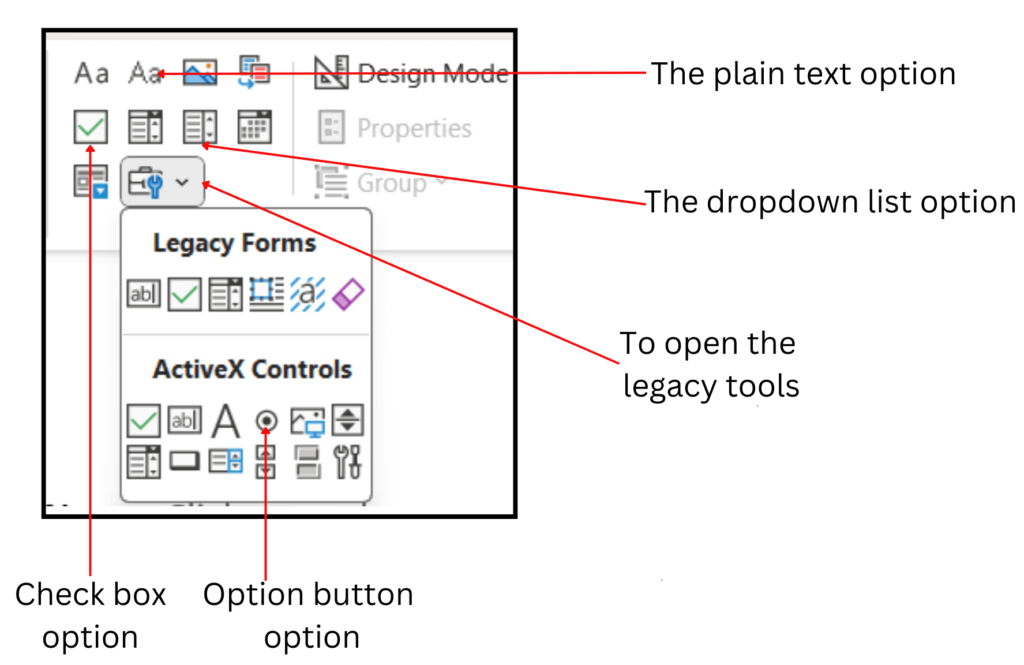
Because fillable forms are designed to reduce errors, it is important to choose carefully the fields used to capture different types of data. To add our fillable fields, we will use the control section on the developer tab. See the image below for the options you will be working with.

We will begin by adding the field for the name. For this, we will use a text box.
While text boxes are easy to set up, you should avoid using them for everything because they are not as user-friendly as some of the other options available. Choosing the correct elements for your data also reduces the chance of people entering data that is not valid.
How to create a textbox in Word
Follow these steps to insert a textbox in Word 365.
- Type name as the label since you want the user to know what they are expected to enter in this field.
- Click on the area where you wish to add the text box.
- Now go to the controls section of your developer tab;
- Choose the plain text option shown in the picture above.
That’s it. You now have an editable text box.
How to add an option button in Word
Now, option buttons are a great choice if you have an item with predefined information where you wish the user to enter information only once. Think of gender, for instance. Even if a person wishes to choose nonbinary or doesn’t wish to give an answer, we will want them to give only one option as the answer.
Follow these steps to set up an option button in Word 365:
- Type gender as the title since this is the next option you will create.
- Press enter.
- Now go to the developer tab and click on the section labeled legacy tools.
- In the drop-down menu, choose the option button;
- With the new item selected, choose properties.
- In the popup menu that appears, change the group name to gender and the caption to male.
- Repeat steps 3 to 6 three times. Each time, you will set the group name to gender, but you will change the caption using the following options only once: female, nonbinary, and I do not wish to say.
- That’s it. You have set up your option button in Word.
⚠️ It is imperative that you keep the same group name for the option buttons that belong to the same set. This sets a limit on the number of options the user is able to enter.
How do I ensure my option buttons have been created correctly?
Here is a simple test to ensure your option button group was created correctly. Look at your developer toolbar. If design mode is selected click on it to deselect it. Now try entering some information in the option button group. Click each option one after the other. If you are able to select any two options at the same time you have not created your group properly. Lets fix it.
- Select design mode again, and then click on the first option button.
- Click properties.
- In the properties section, note the group name.
- Check all of the others to ensure the group names are the same.
- When you find the ones that are different, change the group names so they are all the same.
- That’s it. You have fixed the error.
Using the date picker tool in word
Dates can be written in many different formats. Some write day, month, year. Others prefer month day year. Some will use a number for the month while others will type out the name of the month.
This can be quite confusing. How do you know whether 1/10/2024 mean the first day of October or the 10th day of January. As such if you are allowing users to enter information directly into the computer it is important to use the date picker tool to ensure the date being entered is in one format only.
Follow these steps to add a date option using the date picker tool:
- Write the label, DOB, or date of birth.
- Go to the date picker tool in the controls section of the developer tab (see the image above).
- Click on it.
- Thats it. You have created a date calendar option.
How does the date picker option work?
Let’s test our date picker option.
- Ensure you deselect the design mode option in the control section of the developer toolbar.
- Now go to the date picker tool that you just created and click on it.
- Click the arrow at the side of the date picker tool.
- You should now see a partial calendar with the current month. Use this tool to enter the date.
- You can change month and year as well by clicking the area at the top.
How do you create a dropdown list in Word?
Drop-down lists are commonly used when you wish the user to choose from a limited list of known items. Follow these steps to create a dropdown list in Word:
- To add a dropdown list in Word, go to the control section of the developer tab.
- Click on the dropdown list content control option.
- Click properties.
- In the popup menu that appears, type country in the section labeled title.
- Go down to the section labeled drop-down list properties and click the button marked add.
- In the popup menu, enter the names of the countries you want the user to choose from in the section labeled display name.
- When you are finished, click ok.
- Repeat steps 5 to 7 until you have entered all of the countries in your list.
- Click ok again.
That’s it. You have created a dropdown list in Word 365.
Are you interested in learning to work with more productivity tools? You should explore the features and shortcut keys in Microsoft Excel.
How to add a tickbox in Word?
A check box is often called a tickbox and is usually used when you wish to allow the user to enter multiple items under a given heading.
Since a user can be allergic to several items, we will use a check box for the allergy section. We will create a list of common allergies to make it easy for our users to fill in their allergies in the form.
Follow these steps to add a tickbox in Word:
- Go to the controls section on the developer tab.
- Choose the check box option.
- Enter the label soya to go with your text box.
- Click the tab key on your keyboard. Then, repeat steps one to three, but this time enter peanut as the label.
- Repeat steps one to three again, but this time, enter chocolate as the label.
That’s it. You have created three tickboxes for the user to choose from.
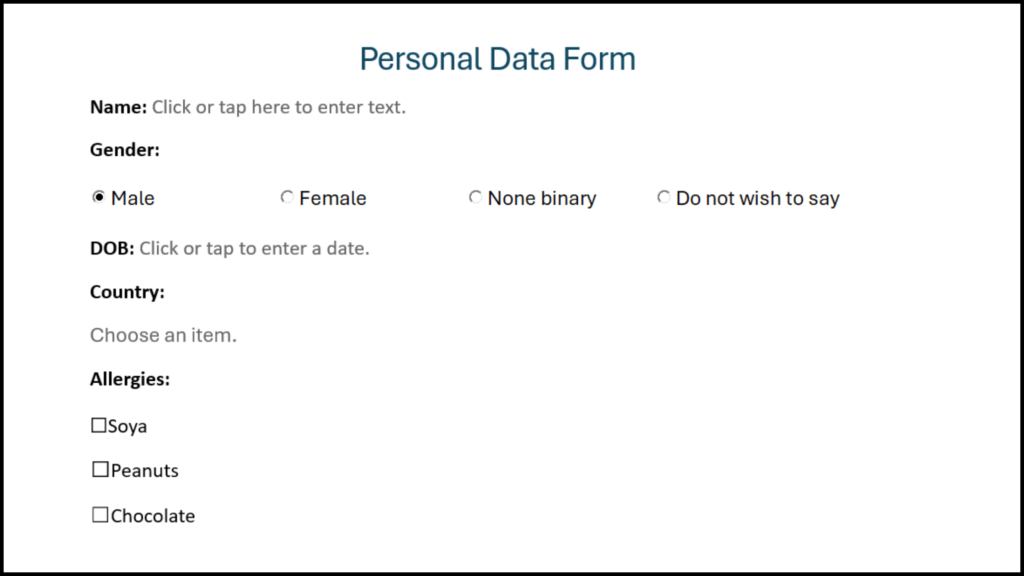
That’s it you have completed creating a small fillable form. Below is a picture of what your fillable form should look like.
Fillable form in Word
Your fillable form should look like this:

Now that you have learned how to go about creating a fillable form in Word you should also add a heading and bold the individual items to format your document properly.
 Skip to content