
Last updated on June 22nd, 2024 at 11:28 am

Computers are supposed to make our work more efficient. So, when using productivity software such as Microsoft Word, you will find many ways to edit what you have typed quickly and efficiently. This means that you should not retype a document just because you made a mistake in the text.
Your time is important, and that includes the time you spent on the original document with those mistakes. So rather than retyping the document, we edit it using processes such as drag and drop, search and replace, and cut and paste in Word. But how do you perform these processes? In this article, we address how to perform:
- Cut and paste;
- Drag and drop; and
- Search and replace in Word 365.
What is cut and paste
As the name suggests, cutting and pasting in word processing software is a tool for editing a document. It allows you to cut ✂️ a piece of content and then paste it in a new location. This means that if you wish to change the arrangement of the content, you can do so with two easy steps that do not include retyping.
Do you know that you can create a fillable form in Word? See our step-by-step guide to creating fillable forms in Word to learn how to do this. You may also learn to set page numbers, headers, and footers.
How to perform cut and place in Word 365
Let’s assume you have this sentence: The quick brown fox jumps over the lazy dog. You want to move the word brown from where it is and place it before the word dog. To cut and paste a part of your text, follow these steps:
- Select the word brown.
- To do so, put your cursor before the word brown.
- Hold down the left mouse button and drag to the right until you get to the end of the word.
- Release the button.
- Next, use your mouse to place the pointer in the selected area.
- Click on the right mouse button and click cut ✂️.
- The word should now be removed.
- Now, move the mouse pointer to the place where you wish to place the word you just cut.
- Click there. Next, right-click on your mouse and click on the first icon that appears under the paste option.
- That’s it! You have just performed cut and paste in Word.
What is the drag and drop function?
The drag-and-drop function is a shorter and simpler way of performing the cut-and-paste operation in Microsoft Word. Think of it this way: when you are writing a letter, your employer may ask you to move some content around. For instance, a sentence that appears in the first paragraph may need to be moved to the last. The drag and drop function allows you to do this in one operation rather than 2.
How to use the drag and drop function
The drag-and-drop function is a very efficient way of moving information within a Word document. To use the drag and drop function, follow these steps;
- First, click at the beginning or the end of the word.
- Then, hold down the left mouse button and drag to either the left or right until you cover all the text that you wish to move. Now release.
- Next, put your mouse on the selected area.
- Hold down your left mouse button and drag the text to where you want it to go in the document.
- Now release.
You just managed to move text from one place to another in your document.
What is the search and replace function in Microsoft Word?
The search and replace function is used to locate certain words inside the document and change it to something else. Say you wrote a story, and you have decided that you would like to change the name of the main character. However, his name was used so often that changing it one at a time would be a daunting task. This is where the search and replace function comes in. You can use the search and replace function to search and replace the word in a few short clicks without having to go back through the entire document and remove the word individually.
How do you use the search and replace function?
The search and replace function is a very fast and simple way of searching for a word and then replacing it. To use this function, follow these steps:
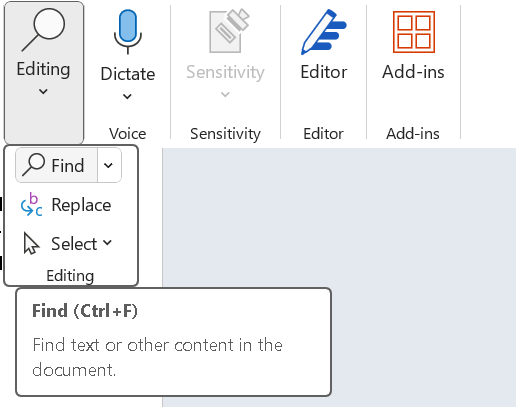
- Go to the home toolbar;
- In the rightmost section, you will see what looks like a magnifying glass With the word Replace.
- Click on it on it.
- In the popup menu that appears, click in the text box next to the words Find what.
- Now, type the word you wish to find. For our purpose, let’s say we are trying to replace the name Brian with Mark. So you need to type Brian.
- Next, next to the words, Replace with. Now type Mark.
- Now, look for the word Replace All at the bottom of the popup menu.
- Click Replace All and the word Brian will be replaced with Mark throughout the document.
That is how you are able to replace a word that was used 200 times in a document in just a few minutes.
There are many formatting features in Microsoft Word 365 that not only make your document presentable but makes it possible to edit a document in just a few short steps. Visit our articles on working with tab, bullets, line spacing, etc, or the other on using underline, bold, subscript, etc to take your mastery of wordprocessing software to another level. What are you waiting for. Try it now!